那就开始吧
本来以为博客插入图片会比较简单, 结果不出所料,各种坑都需要爬的
结果当然是成功咯
先说遇到的几个点吧
- JS构造
FormData与SpringMVC 的MultipartFile[] files获取数据 - 通过
Mime-Type获取文件的后缀名 - 开发模式下 Springboot 配置 外部静态资源 映射
- docker 的
Nginx容器和java容器同时挂载同一个主机目录
一个一个说吧
JS构造FormData 与SpringMVC 的 MultipartFile[] files获取数据
第一版
前端 创建FormData对象
# this.imageList 是我的图片 {{'filename':file} ...}

var formdata = new FormData()
      for (const name in this.imageList) {
        formdata.append(name, this.imageList[name])
}然后通过axios发送Post数据
后端 action 获取参数
@PostMapping("image/upload")
ResponseData upLoadImages(@RequestParam("files")  MultipartFile[] files) {
    for(MultipartFile file in files){
        //do save
    }
}不出所料files是空的
看了一眼F12
FormData是这样的
'1.jpg':(file)
'2.jpg':(file)
//在后端可以通过 @RequestParam("1.jpg")  MultipartFile[] files ,@RequestParam("2.jpg")  MultipartFile[] files获取
//但是不是我想要的看看js的FormData的API吧
interface FormData {
    append(name: string, value: string | Blob, fileName?: string): void;   #重点在这里
    delete(name: string): void;
    get(name: string): FormDataEntryValue | null;
    getAll(name: string): FormDataEntryValue[];
    has(name: string): boolean;
    set(name: string, value: string | Blob, fileName?: string): void;
    forEach(callbackfn: (value: FormDataEntryValue, key: string, parent: FormData) => void, thisArg?: any): void;
}
于是修改前端代码
# this.imageList 是我的图片 {{'filename':file} ...}

var formdata = new FormData()
      for (const name in this.imageList) {
        formdata.append("files", this.imageList[name],name) #可以通过@RequestParam("files") 获取了.
      }
后端可以通过前面数组的形式接收参数了
通过Mime-Type获取文件的后缀名
我的博客MD编辑器用了hinesboy在GitHub的mavonEditor组件
他提供了一个替换文本中图片地址的方法,需要传入他提供的index和新的rul
$img2Url(index, url)为了让后台能够将上传文件的index与保存后的url成对返回
我把前端上传文件时的文件名改为了index
# this.imageList 是 图片编辑器index 和 file 的键值对数组 {{index:file} ...}

var formdata = new FormData()
      for (const index in this.imageList) {
        formdata.append("files", this.imageList[index ],index )  #文件名现在是index eg.1 //2 ,3
      }
所以后端保存的时候,不能直接用源文件的后缀名了
但是可以获得MIME-TYPE,自己找又怕找不齐
然后就开始找有没有人做过这个表格
复制参考 samuelneff / MimeTypeMap 虽然是C#的项目,但是map是整理好的啊粘贴引入OK.
开发模式下 Springboot 配置 外部静态资源 映射
由于第一次通过Springboot Jar 进行项目部署 部署计划是使用Nginx做静态资源处理 但是开发环境不太想再隔一层Nginx
于是搜索到可以写一个配置Bean WebMvcConfigurerAdapter
但是API文档 提示已经弃用了.
网络不好也再也不用百度搜索
正解是
import org.springframework.beans.factory.annotation.Value;
import org.springframework.context.annotation.Configuration;
import org.springframework.context.annotation.Profile;
import org.springframework.web.servlet.config.annotation.ResourceHandlerRegistry;
import org.springframework.web.servlet.config.annotation.WebMvcConfigurer;

/**
 * 开发模式下,映射本地目录到静态资源
 * 部署 prod模式下,使用Nginx进行静态资源映射
 */
@Configuration
@Profile(value = "dev") //我使用了profile 进行配置控制
public class ResourceWebMvcConfigurer implements WebMvcConfigurer {

    private String staticPath;

    //注入配置文件写的地址 path: eg. E:\mystorage
    public ResourceWebMvcConfigurer(@Value("${platform.staticPath}") String path) {
        this.staticPath = path;
    }

    @Override
    public void addResourceHandlers(ResourceHandlerRegistry registry) {
        registry.addResourceHandler("/storage/**")
                .addResourceLocations("file:/" + staticPath); //绝对地址: file:/E:\mystorage
    }
}这样当访问`/storage/下的url地址时,就会去file:/E:\mystorage找
注意给Shiro或者SpringSecurity`开放权限**
docker 的 Nginx 容器和 java 容器同时挂载同一个主机目录
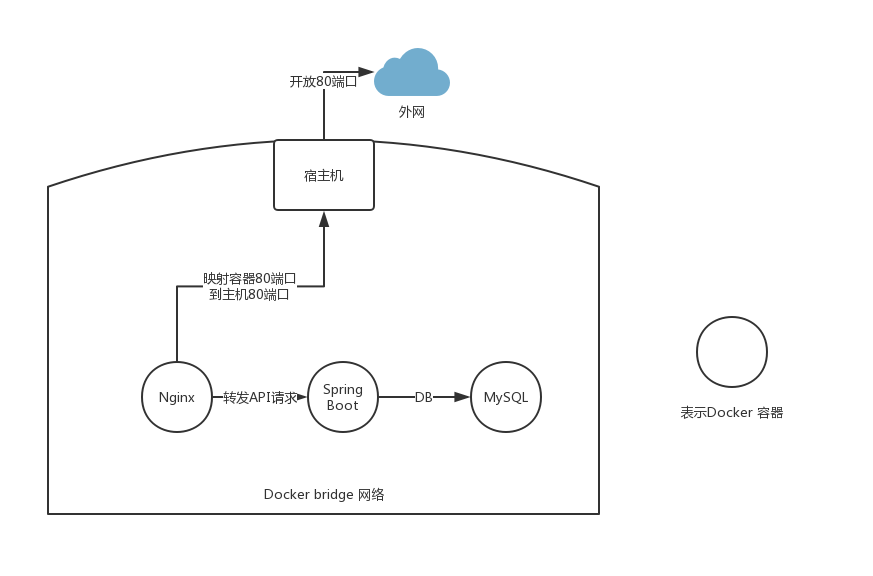
生产环境下,我是使用Docker容器进行部署的
网络大概这个意思

数据卷大大概这个样子
Nginx 的 /usr/share/nginx/html -> 宿主的 /root/docker-mount/nginx/dist
Springboot 的 /hoody-site/storage -> 宿主的/root/docker-mount/api/storage
下一步再给Nginx映射一个目录到宿主的/root/docker-mount/api/storage
应该就O了,
然后增加 Nginx 的 /usr/share/nginx/html/storage -> 宿主的/root/docker-mount/api/storage
启动.挂载失败
没找到把docker 容器挂载目录交叉这个情况分析的清楚的文章
我尝试了一些配置 结果是 docker容器可以挂载到同一个宿主机目录,但是不能挂载到另一容器挂载目录的子目录 以上描述的准确性待定
我的处理方式是,宿主创建 /root/docker-mount/storage 目录,然后2个容器都将目录绑定到这个目录
::: hljs-center
完
:::