前言
这几天在尝试搞一个微信公众号,然后用家里的树莓派做服务器.
然后通过frp将树莓派映射到我的阿里云服务器
先尝试了直接写一个springboot web demo 做接口,大概能够将用户发送的信息返回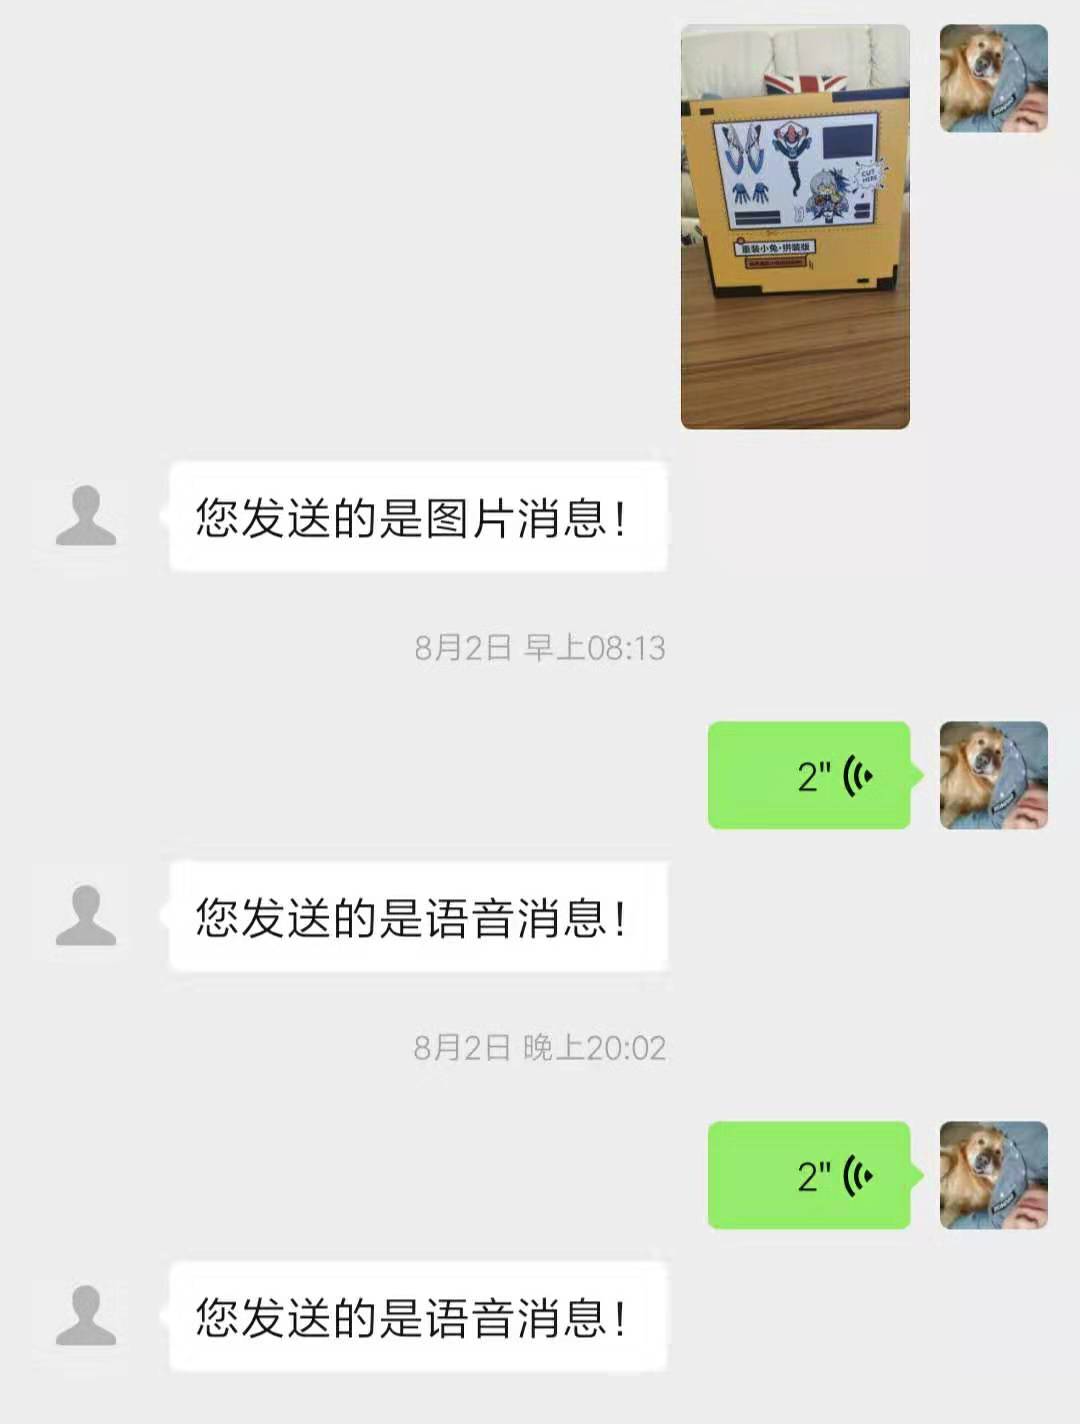
然后,把微信接口做个成 java 的单独模块吧
这样如果有机会接触微信公众号开发的话,还可以直接用(大概)
由于我只有资格申请订阅号,功能比较少,所以也只实现了一部分东西.
- 微信接入
- 用户消息回复
从扩展功能上来看,后续还需要:
- 微信上传/下载多媒体文件
- 自定义菜单管理
- 用户绑定
- 收付款
- etc.
有些需要一个界面才方便使用,于是想起了Swagger-UI
Swagger-UI
一个将Swagger API Spec以HTML页面展现出来的模块
它是一个带web管理页面的starter
所以
做成一个springboot starter
最近也在尝试对springboot 进行更多了解
想像中,项目只需要引入微信starter就能够直接进行业务开发
以下文字包含这些:
- 创建自定义
springboot starter - 根据需要配置
starter - 从springboot项目引入并使用
微信starter
PS:由于个人习惯使用Groovy作为开发语言,所以内容中会包含部分与Groovy相关代码.当做java读就行了
创建自定义springboot starter
1.新建Maven项目,并添加依赖
创建一个Maven空白项目
并添加如下依赖pom.xml
<?xml version="1.0" encoding="UTF-8"?>
<project xmlns="http://maven.apache.org/POM/4.0.0"
         xmlns:xsi="http://www.w3.org/2001/XMLSchema-instance"
         xsi:schemaLocation="http://maven.apache.org/POM/4.0.0 http://maven.apache.org/xsd/maven-4.0.0.xsd">
    <modelVersion>4.0.0</modelVersion>
    <groupId>vip.hoody</groupId>
    <artifactId>hoody-wechat-springboot-starter</artifactId>
    <version>1.0-SNAPSHOT</version>

    <dependencies>
        <!-- 想要让自定义配置项有提示,导入这个包,在项目编译后会生成元数据,同样是在META-INF目录下-->
        <!-- 会自动生成spring-configuration-metadata.json文件。-->
        <dependency>
            <groupId>org.springframework.boot</groupId>
            <artifactId>spring-boot-configuration-processor</artifactId>
            <version>2.1.6.RELEASE</version>
        </dependency>
        <!--spring mvc 便于添加web-->
        <dependency>
            <groupId>org.springframework.boot</groupId>
            <artifactId>spring-boot-starter-web</artifactId>
        </dependency>
        <!--Groovy混合开发-->
        <dependency>
            <groupId>org.codehaus.groovy</groupId>
            <artifactId>groovy-all</artifactId>
            <version>2.5.7</version>
            <type>pom</type>
        </dependency>
    </dependencies>

    <!--根据springboot 依赖齐版本-->
    <dependencyManagement>
        <dependencies>
            <dependency>
                <groupId>org.springframework.boot</groupId>
                <artifactId>spring-boot-dependencies</artifactId>
                <version>2.1.6.RELEASE</version>
                <type>pom</type>
                <scope>import</scope>
            </dependency>
        </dependencies>
    </dependencyManagement>

    <build>
        <plugins>
            <plugin>
                <groupId>org.springframework.boot</groupId>
                <artifactId>spring-boot-maven-plugin</artifactId>
            </plugin>
            <!--groovy 编译依赖-->
            <plugin>
                <groupId>org.codehaus.gmavenplus</groupId>
                <artifactId>gmavenplus-plugin</artifactId>
                <version>1.6.3</version>
                <executions>
                    <execution>
                        <goals>
                            <goal>addSources</goal>
                            <goal>addTestSources</goal>
                            <goal>generateStubs</goal>
                            <goal>compile</goal>
                            <goal>generateTestStubs</goal>
                            <goal>compileTests</goal>
                            <goal>removeStubs</goal>
                            <goal>removeTestStubs</goal>
                        </goals>
                    </execution>
                </executions>
            </plugin>
        </plugins>
    </build>
</project>
2.创建配置类
- 指定将包
vip.hoody.wechat添加入spring bean 扫描范围 - 可使用Spring注解进行装配
StarterConfiguration.groovy
package vip.hoody.wechat.config

import org.springframework.context.annotation.ComponentScan
import org.springframework.context.annotation.Configuration

@Configuration
/** 指定扫描包路径 */
@ComponentScan(basePackages = "vip.hoody.wechat")
class StarterConfiguration {

}
3.创建微信服务处理控制器 WechatController
/src/main/groovy/vip/hoody/wechat/controller/WecahtController.groovy
package vip.hoody.wechat.controller

import org.springframework.beans.factory.annotation.Autowired
import org.springframework.web.bind.annotation.GetMapping
import org.springframework.web.bind.annotation.PostMapping
import org.springframework.web.bind.annotation.RequestParam
import org.springframework.web.bind.annotation.RestController
import vip.hoody.wechat.config.WechatConfig
import vip.hoody.wechat.service.WeChatService
import vip.hoody.wechat.utils.SignCheck

import javax.servlet.http.HttpServletRequest

@RestController
class WeChatController {

    @Autowired
    WechatConfig config

    @Autowired
    private WeChatService weChatService

    /**
     * 处理微信服务器发来的get请求,进行签名的验证
     *
     * signature 微信端发来的签名
     * timestamp 微信端发来的时间戳
     * nonce     微信端发来的随机字符串
     * echostr   微信端发来的验证字符串
     */
    @GetMapping('${hoody.wechat.url: wechat}')
    String handleWeChat(@RequestParam("signature") String signature,
                        @RequestParam("timestamp") String timestamp,
                        @RequestParam("nonce") String nonce,
                        @RequestParam("echostr") String echostr) {
        boolean isTrust = SignCheck.checkSignature(config.TOKEN, signature, timestamp, nonce)
        if (isTrust) {
            return echostr
        } else {
            return null
        }
    }

    /**
     * 监听微信消息,返回符合要求的xml
     * @param request
     * @return
     */
    @PostMapping(value = '${hoody.wechat.url}', produces = "application/xml;charset=UTF-8")
    String handleUserMsg(HttpServletRequest request) {
        return weChatService.processRequest(request.getInputStream())
    }
}3.创建服务类WeChatService
/src/main/groovy/vip/hoody/wechat/servicie/WechatService.groovy
package vip.hoody.wechat.service

import org.slf4j.Logger
import org.slf4j.LoggerFactory
import org.springframework.beans.factory.annotation.Autowired
import org.springframework.stereotype.Service
import vip.hoody.wechat.IWechatHandler
import vip.hoody.wechat.WeChatFactory
import vip.hoody.wechat.bean.received.ReceivedBaseMsg
import vip.hoody.wechat.bean.reply.ReplyBaseMsg

@Service
class WeChatService {

    private static final Logger log = LoggerFactory.getLogger(this.class)

    /**
     * 处理器接口,使用项目实现接口
     */
    @Autowired
    private IWechatHandler wechatHandler


    /**
     * 处理收到的微信信息
     * @param xml 文本流
     * @return 响应xml文本,符合wechat接口
     */
    String processRequest(InputStream xml) {
        ReceivedBaseMsg userMsg = WeChatFactory.getWechatReceivedMsg(xml)
        try {
            ReplyBaseMsg replyBaseMsg = wechatHandler.handle(userMsg)
            return replyBaseMsg.toXml()
        } catch (Exception e) {
            log.warn("处理用户微信消息出现异常", e)
            return WeChatFactory.createTextReply(userMsg, "处理用户微信消息出现异常").toXml()
        }
    }
}
4.消息处理接口
将接口实现后,注入spring处理用户发送的微信消息
/src/main/groovy/vip/hoody/wechat/IWechatHandler.java
package vip.hoody.wechat;

import vip.hoody.wechat.bean.event.EventBaseMsg;
import vip.hoody.wechat.bean.received.*;
import vip.hoody.wechat.bean.reply.ReplyBaseMsg;

/**
 * 消息处理接口
 * 实现接口,返回消息对象
 */
public interface IWechatHandler {

    ReplyBaseMsg handle(ReceivedTextMsg msg);

    ReplyBaseMsg handle(ReceivedImageMsg msg);

    ReplyBaseMsg handle(ReceivedLinkMsg msg);

    ReplyBaseMsg handle(ReceivedLocationMsg msg);

    ReplyBaseMsg handle(ReceivedShortVideoMsg msg);

    ReplyBaseMsg handle(ReceivedVideoMsg msg);

    ReplyBaseMsg handle(ReceivedVoiceMsg msg);

    ReplyBaseMsg handle(EventBaseMsg msg);
}
根据需要配置starter
参考程序羊-SpringBoot 应用程序启动过程探秘
Spring Boot自动注入的奥秘就来源于 Spring Boot应用在启动过程中会通过 SpringFactoriesLoader 加载所有 META-INF/spring.factories 文件,通过一系列的处理流程最终将 spring.factories 文件中的定义的各种 beans 装载入 ApplicationContext容器。
配置META-INF/spring.factories
创建文件,指定Springboot启动的时候扫描配置类,并加载bean
META-INF/spring.factories
org.springframework.boot.autoconfigure.EnableAutoConfiguration=vip.hoody.wechat.config.StarterConfiguration从springboot项目引入并使用微信starter
1.创建Springboot项目并引入微信starter
pom.xml
     <dependency>
            <groupId>vip.hoody</groupId>
            <artifactId>hoody-wechat-springboot-starter</artifactId>
            <version>1.0-SNAPSHOT</version>
        </dependency>
2.添加微信开发者信息
application.yml
#微信开发者信息
hoody:
  wechat:
    app-id: 'your appid'
    app-secret: 'your appSecret'
    token-rate: 7200000  #(ms) access_token refreash rate(default:7200000)
mapping3.实现vip.hoody.wechat.IWechatHandler接口
实现接口,响应收到的微信信息WechatHandlerImpl.java
public class WechatMsgHandler implements IWechatHandler {

    @Override
    public ReplyBaseMsg handle(ReceivedTextMsg msg) {
        return new ReplyTextMsg(msg.fromUserName, msg.toUserName, new Date().getTime().toString(), "你在发是:图片信息");
    }

    @Override
    public ReplyBaseMsg handle(ReceivedImageMsg msg) {
        return new ReplyTextMsg(msg.fromUserName, msg.toUserName, new Date().getTime().toString(), "你在发是:图片信息");
    }

    @Override
    public ReplyBaseMsg handle(ReceivedLinkMsg msg) {
        return new ReplyTextMsg(msg.fromUserName, msg.toUserName, new Date().getTime().toString(), "你在发是:图链接息");
    }

    @Override
    public ReplyBaseMsg handle(ReceivedLocationMsg msg) {
        return new ReplyTextMsg(msg.fromUserName, msg.toUserName, new Date().getTime().toString(), "你在发是:定位信息");
    }

    @Override
    public ReplyBaseMsg handle(ReceivedShortVideoMsg msg) {
        return new ReplyTextMsg(msg.fromUserName, msg.toUserName, new Date().getTime().toString(), "你在发是:小视频信息");
    }

    @Override
    public ReplyBaseMsg handle(ReceivedVideoMsg msg) {
        return new ReplyTextMsg(msg.fromUserName, msg.toUserName, new Date().getTime().toString(), "你在发是:视频信息");
    }

    @Override
    public ReplyBaseMsg handle(ReceivedVoiceMsg msg) {
        return new ReplyTextMsg(msg.fromUserName, msg.toUserName, new Date().getTime().toString(), "你在发是:音频信息");
    }

    @Override
    public ReplyBaseMsg handle(EventBaseMsg msg) {
        return new ReplyTextMsg(msg.fromUserName, msg.toUserName, new Date().getTime().toString(), "你在发是:图片信息");
    }
}
4.返回信息给用户
所有返回信息继承ReplyBaseMsg,
可通过WeChatFactory创建返回信息
后续
这里写的比较杂,现在也才弄完一部分
随着对Springboot的深入,后续会单独出一个关于Springboot stater的介绍.