前言
关于Springboot start 自定义开发的文档真的是少,
而且还大量都是Hello World型项目,
就建一个starter 然后引用,实在不够用
想着尽力自己写一个把
本文包含
- 一. 创建一个spring-boot-starter项目
- 二. 配置
META-INF/spring.factories,进行spring装配 - 三. 在自定义
starter中读取application.yml的属性值 - 四. 元数据
spring-configuration-metadata.json介绍/创建 - 五.
Test单元测试配置 - 六. 关于其他的使用
全文基于springboot 2.1.6.RELEASE进介绍
希望我这份文档能够帮助正在进行spring-boot-starter开发的你
一.创建一个spring-boot-starter项目
创建一个Maven空白项目
并编辑依赖pom.xml
<?xml version="1.0" encoding="UTF-8"?>
<project xmlns="http://maven.apache.org/POM/4.0.0"
         xmlns:xsi="http://www.w3.org/2001/XMLSchema-instance"
         xsi:schemaLocation="http://maven.apache.org/POM/4.0.0 http://maven.apache.org/xsd/maven-4.0.0.xsd">
    <modelVersion>4.0.0</modelVersion>

    <groupId>vip.hoody</groupId>
    <artifactId>starter-base</artifactId>
    <version>1.0-SNAPSHOT</version>

    <!-- 增加springboot依赖 -->
    <dependencies>
        <dependency>
            <groupId>org.springframework.boot</groupId>
            <artifactId>spring-boot-starter</artifactId>
        </dependency>
    </dependencies>

    <!--根据springboot 依赖版本管理-->
    <dependencyManagement>
        <dependencies>
            <dependency>
                <groupId>org.springframework.boot</groupId>
                <artifactId>spring-boot-dependencies</artifactId>
                <version>2.1.6.RELEASE</version>
                <type>pom</type>
                <scope>import</scope>
            </dependency>
        </dependencies>
    </dependencyManagement>
    <!-- springboot maven 插件 -->
    <build>
        <plugins>
            <plugin>
                <groupId>org.springframework.boot</groupId>
                <artifactId>spring-boot-maven-plugin</artifactId>
            </plugin>
        </plugins>
    </build>
</project>
写一个测试服务类
vip.hoody.service.DemoService
package vip.hoody.service;

import org.springframework.stereotype.Service;
import java.util.Date;

@Service
public class DemoService {
    public String getSystemTime() {
        return "来自Starter的信息:" + new Date().toString();
    }
}
二. 配置META-INF/spring.factories,进行spring装配
Spring Boot自动注入的奥秘就来源于 Spring Boot应用在启动过程中会通过 SpringFactoriesLoader 加载所有依赖的
META-INF/spring.factories文件,通过一系列的处理流程最终将 spring.factories 文件中的定义的各种 beans 装载入 ApplicationContext容器
所以,我们需要创建spring.factories 文件
然后在文件中指定我们的MyConfiguration.java文件MyConfiguration.java中进行bean的配置
1.创建目录 src\main\resources\META-INF
2.并在此目录下创建文本文件spring.factories
spring.factories
#指定java配置类, \ 是换行连接符
org.springframework.boot.autoconfigure.EnableAutoConfiguration= \
vip.hoody.config.MyConfiguration spring.factories中也可以进行多个配置类的指定,用逗号,隔开
org.springframework.boot.autoconfigure.EnableAutoConfiguration=\
vip.hoody.config.MyConfiguration ,\
vip.hoody.config.AnotherConfiguration 3.创建vip.hoody.config.MyConfiguration配置类
在配置类中注入之前创建的DemoService
vip.hoody.config.MyConfiguration
package vip.hoody.config;

import vip.hoody.service.DemoService;
import org.springframework.context.annotation.Bean;
import org.springframework.context.annotation.ComponentScan;
import org.springframework.context.annotation.Configuration;

@Configuration
@ComponentScan(basePackages = {"vip.hoody.service"})
public class MyConfiguration {
    @Bean
    DemoService getDemoService() {
        return new DemoService();
    }
}
这里有2种方式进行Bean的配置
第一种,指定包路径,对应包路径下的类将会根据spring类注解进行自动注入
@ComponentScan(basePackages = {"vip.hoody.service","vip.hoody.util"})第二种,直接进行bean的注入
  @Bean
    DemoService getDemoService() {
        return new DemoService();
}到这一步,基本的Hello World就完成了.
name怎么使用starter呢
1.打包自定义starter
在pom.xml目录路径下运行
mvn installmaven将会进行编译打包成jar,并把打包的jar放入本地仓库
2.引入stater
然后新建一个Spring-boot项目,然后在依赖中添加
    <dependency>
            <groupId>vip.hoody</groupId>
            <artifactId>starter-base</artifactId>
            <version>1.0-SNAPSHOT</version>
</dependency> 3.执行DemoService的getSystemTime()查看结果
@Autowired
DemoService demoService;

public void method(){
    System.out.println(demoService.getSystemTime());
}
三. 在自定义starter中读取application.yml的属性值
作为一个
spring-boot-starter模块,很多情况下需要用户在使用时进行必要的配置
例如我希望开发者使用我的模块时在application.yml中配置以下属性
然后在代码中读取并执行不同的行为
application.yml
vip:
  hoody:
    age: 50
    name: Peter
1.EL表达式进行读取
示例:
package vip.hoody.service;

import org.springframework.beans.factory.annotation.Value;
import org.springframework.stereotype.Service;
import java.util.Date;

@Service
public class DemoService {

    @Value("${vip.hoody.age}")
    Long age;

    @Value("${vip.hoody.name}")
    String name;

    public String getInfo() {
        return "来自Starter的信息,name:" + name + " age:" + age;
    }
}2.通过@ConfigurationProperties进行读取
首先需要在之前的MyConfiguration.java类上@EnableConfigurationProperties注解MyConfiguration
@Configuration
@EnableConfigurationProperties
@ComponentScan(basePackages = {"vip.hoody"})
public class MyConfiguration {

    @Bean
    DemoService getDemoService() {
        return new DemoService();
    }
}
创建Bean类,并在类上加入@ConfigurationProperties(prefix = "vip.hoody")注解prefix 表示此类所属的节点名称,类内部的属性将会映射到这个节点下
package vip.hoody.config;

import org.springframework.boot.context.properties.ConfigurationProperties;
import org.springframework.stereotype.Component;

@ConfigurationProperties(
        prefix = "vip.hoody"
)
@Component
public class InfoConfig {

    /** 使用者用户名 */
    private String name = "hoody";
    /** 使用者年龄 */
    private Integer age = 18;

    public Integer getAge() {
        return age;
    }

    public void setAge(Integer age) {
        this.age = age;
    }

    public String getName() {
        return name;
    }

    public void setName(String name) {
        this.name = name;
    }
}
使用如下
    @Autowired
    InfoConfig infoConfig;

    public String getInfo2() {
        return "来自Starter的信息,name:" + infoConfig.getName() + " age:" + infoConfig.getAge();
    }
四. 元数据 spring-configuration-metadata.json介绍/创建
元数据文件,提供所有支持的配置属性的详细信息。这些文件旨在允许IDE开发人员在用户使用application.properties 或application.yml文件时提供上下文帮助和自动补全
1.使用场景
如同第三节的情况
作为一个spring-boot-starter模块,很多情况下需要用户在使用时进行必要的配置
例如我希望开发者使用我的模块时在application.yml中配置以下属性
application.yml
vip:
  hoody:
    age: 50
    name: Peter
如果没有配置则使用默认值 age:18和name:hoody,
只能通过文档进行描述配置,所以我们需要一个更好的方法 写注释总好过写文档吧
添加元数据描述后,开发者便能通过IDE提示看到此配置属性的默认值/值类型等信息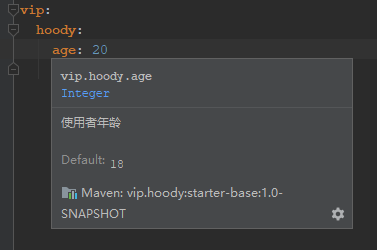
2.创建元数据描述文件
第一种,手动创建
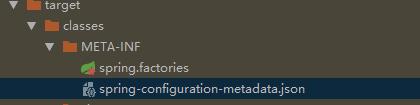
首先, 创建META-INF目录
并在此目录下创建spring-configuration-metadata.json文件
spring-configuration-metadata.json
{
  "groups": [
    {
      "name": "vip.hoody",
      "type": "vip.hoody.config.InfoConfig",
      "sourceType": "vip.hoody.config.InfoConfig"
    }
  ],
  "properties": [
    {
      "name": "vip.hoody.age",
      "type": "java.lang.Long",
      "description": "使用者年龄",
      "sourceType": "vip.hoody.config.InfoConfig",
      "defaultValue": 18
    },
    {
      "name": "vip.hoody.name",
      "type": "java.lang.String",
      "description": "使用者用户名",
      "sourceType": "vip.hoody.config.InfoConfig",
      "defaultValue": "hoody"
    }
  ],
  "hints": []
}
第二种, 通过spring-boot-configuration-processor插件进行自动创建
通过注解处理器,创建你自己的元数据文件 - SpringDoc
通过Spring文档可以了解
1.引入spring-boot-configuration-processor依赖
pom.xml添加以下
        <dependency>
            <groupId>org.springframework.boot</groupId>
            <artifactId>spring-boot-configuration-processor</artifactId>
        </dependency>
2.创建读取类
使用 @ConfigurationProperties(prefix = "vip.hoody")注解prefix 表示此类所属的节点名称
类内部的属性将会映射到这个节点下
InfoConfig.java
package vip.hoody.config;

import org.springframework.boot.context.properties.ConfigurationProperties;
import org.springframework.stereotype.Component;

@ConfigurationProperties(
        prefix = "vip.hoody"
)
@Component
public class InfoConfig {

    /** 使用者用户名 */
    private String name = "hoody";
    /** 使用者年龄 */
    private Integer age = 18;

    public Integer getAge() {
        return age;
    }

    public void setAge(Integer age) {
        this.age = age;
    }

    public String getName() {
        return name;
    }

    public void setName(String name) {
        this.name = name;
    }
}
3.生成元数据文件
执行
mvn install将会在Jar包和target目录 下的 /classes/META-INF/路径生成元数据文件
五. Test单元测试配置
单独的
Spring-boot-starter并不是一个完整的应用
大多数时候都是作为一个实际应用的一部分存在
如果是通过另一个项目引用并启动项目的话,会在Debug时造成不必要的麻烦
所以需要创建能够独立运行的Test
依赖
建立单元测试需要引入以下2个依赖
pom.xml
        <!--test-->
        <dependency>
            <groupId>org.springframework.boot</groupId>
            <artifactId>spring-boot-starter-test</artifactId>
        </dependency>
        <dependency>
            <groupId>org.springframework.boot</groupId>
            <artifactId>spring-boot-test-autoconfigure</artifactId>
</dependency>spring-boot-starter-test: 官方提供的测试包,包含Junit的集成spring-boot-test-autoconfigure: 官方提供的测试配置自动加载,可以通过注解进行配置
测试例子
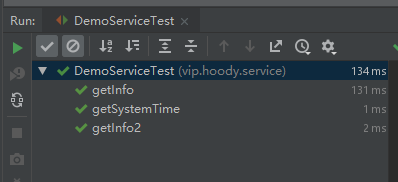
先来看一个简单的测试文件, 接下来我会解释各注解的意义
vip.hoody.service.DemoServiceTest.java
package vip.hoody.service;

import org.junit.Test;
import org.junit.runner.RunWith;
import org.springframework.beans.factory.annotation.Autowired;
import org.springframework.boot.test.context.SpringBootTest;
import org.springframework.test.context.junit4.SpringRunner;
import vip.hoody.config.InfoConfig;
import static org.junit.Assert.*;

@RunWith(SpringRunner.class)
@SpringBootTest(classes = {vip.hoody.config.MyConfiguration.class})
@TestPropertySource("classpath:test.properties")
public class DemoServiceTest {
    @Autowired
    DemoService demoService;

    @Autowired
    InfoConfig infoConfig;

    @Test
    public void getSystemTime() {
        System.out.println(demoService.getSystemTime());
    }

    @Test
    public void getInfo() {
        assertEquals(new Integer(20), demoService.age);
        assertEquals("Peter", demoService.name);
    }

    @Test
    public void getInfo2() {
        assertEquals(new Integer(20), infoConfig.getAge());
        assertEquals("Peter", infoConfig.getName());
    }
}
注解-意义
@RunWith(SpringRunner.class): 标识为Spring提供的JUnit运行环境;
@SpringBootTest(classes = {vip.hoody.config.MyConfiguration.class})不同于完整的Springboot项目,单独的starter没有Application.class所以需要指定环境需要加载的Configuration文件, 此处的classes的值是数组,根据测试的覆盖范围需要把涉及到的Configuration文件写入
@Test: Junit的测试方法,需要待测的方法必须加入此注解,否则或报错
java.lang.Exception: No tests found matching Method@TestPropertySource("classpath:test.properties") 指示测试时读取
resource/test.properties作为配置文件,因为作为一个Starter,运行时读取依赖它的应用的配置文件,所以测试中需要指定一个配置文件作为数据来源其他Junit 如
AfterBefore等请按照Junit介绍使用
六. 关于其他的使用
- 在starter中 也可以引入
spring-boot-starter-web并创建Controller映射url,url地址可以读取配置文件,便于依赖方进行修改 spring.factories文件中还可以添加ApplicationListener,PropertySourceLoader等很多配置,请查阅相关文档
七. GitHub 项目地址
本文涉及的项目代码 GitHub HoodyHuo/base-spring-boot-starter